![]() The Multimedia extension is a means for creating multi-faced buttons for multimedia authoring programs, or other purposes
such as web rollovers etc.
The Multimedia extension is a means for creating multi-faced buttons for multimedia authoring programs, or other purposes
such as web rollovers etc.
You can access Multimedia Export by the menu: Files- MM & Web Export
![]() By multi-faced buttons, we mean a button that has three states: Normal, Highlighted and Pushed. These buttons are positioned one on top of another. Multimedia authoring tools,
such as Multimedia Builder, use these images to show interactivity on the multimedia presentation. The Normal button is displayed
during inactivity. If a user hovers over the button with the mouse,
then the second Highlighted image will be displayed telling
the user that he is over an Active button. If the user presses the
button then the third Pushed image will than be displayed. Such
kinds of objects are very common for all authoring systems.
By multi-faced buttons, we mean a button that has three states: Normal, Highlighted and Pushed. These buttons are positioned one on top of another. Multimedia authoring tools,
such as Multimedia Builder, use these images to show interactivity on the multimedia presentation. The Normal button is displayed
during inactivity. If a user hovers over the button with the mouse,
then the second Highlighted image will be displayed telling
the user that he is over an Active button. If the user presses the
button then the third Pushed image will than be displayed. Such
kinds of objects are very common for all authoring systems.
Real-DRAW allows you to design such buttons. And for Multimedia Builder users, the best news is that it also allows you to export the whole project as an MBD file which is the work file type for Multimedia Builder.
For other users Real-DRAW can export the projects as a number of separate graphic images plus a Script. Script is a very simple but powerful language allowing you to create a file in XML, HTML, Java Script or any other text based language.
To work with the Multimedia Extension you have to open its window first. Menu: View-Multimedia Extension. Each object on the canvas can have the extensions enabled, and if you click on any object, you will see that it only has the Normal state selected.
 |
To enable the multimedia extension
for a selected object you have to select one of the following
options:
The Has Highlighted Frame or the Pushed frame check-box. In most cases you would like to select both - creating a 3-state button. The state selector on the white background (on the upper left part of the Multimedia Extension window) tells you in which state you are currently editing. Looking at the image on the left you can see that we are editing with the Normal Frame selected. |
To change which state (frame) you are editing just click on the appropriate item in the State-selector.
Frame Positions
The frames can have different positions - you may want to move the pushed frame of the button a few pixels down and
to the left to simulate the pushing action. It means that if you are editing in
the Highlighted or Pushed state and you move the object - you move it only in this frame - in the other frames the object will remain
in the same position.
This doesn't apply to the Normal frame however.
If you are editing the Normal frame of the object and you move the object - you will also move both the Highlighted and Pushed frames as well.
Keep two and more Objects Together
Many times you need more than one object to create each button on your design. Imagine, that just a simple Square with text already has 2 objects.
How do you tell Real-Draw that these objects belong to one button?
This is actually very easy - using Packages
Because Packages behave virtually the same way as single objects, you can also create a Highlighted and Pushed frame for them.
Each frame will also have its own independent set of data!
See the following example:
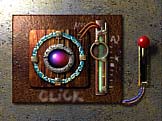
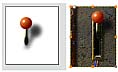
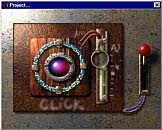
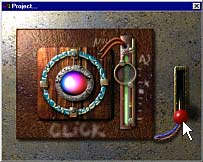
1. This is that we designed for a multimedia interface. Note the handle on the right which we created as a button, so that when user clicks on the handle it will move down.
2. Now lets carefully select all the objects we need in the handle and don't forget the shadow. When it's selected, click the Create package button. We can now double click on the new package to open it, to see if all objects we want are inside, and they're if not, you can easily pick one from the document, and simply copy it to the opened package view.
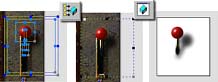
3. Let's close the Package for now. Next, when in the main document, select the Package, and in the Multimedia Extension window Check, the Has Highlighted and Has Pushed Frame options.

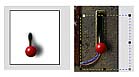
4. We already have Pushed selected, so let's work on it. Double-click on it to open the Package on this frame. Then re-arrange the objects so the handle is in the down position. Rotate the shadow to get to the right position as well and close the package. You may get a warning about an object being outside the package (probably the shadow bitmap). You may ignore it if he package looks fine, or you can fix it by simply clicking on the Reload package button and selecting any of the options.
For example, Reload and Resize to original. Now move the Package so that it is in position you want.
5. We still a have highlighted frame which you may or may not edit. Let's say we just want the red handle to glow little if the user moves their mouse over it. Select the Highlighted frame in Multimedia Extension and the handle should change to its previous position, displaying a Highlighted frame, which is a copy of the Normal frame by default.
6. Open the Package on this frame by double clicking. Change the color of the red sphere to orange or do whatever else you think may be good.
For example move it to the middle.
7. We're done. Check all of the Normal, Highlighted, and Pushed buttons
to see if the transition is OK and go to menu: File - Multimedia Export.
Leave the Multimedia Builder as the source and export it. Now open
the Multimedia Builder and load the file to test it. You should have a great working handle.
Note that the Handle is created in a Bitmap Button in MMB, and that the button is set to, Locked in designer, so that you can't accidentally move it with the mouse.
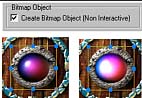
Create Bitmap Object - Solo mode
Sometimes you don't really want to have a button but you want to have a separate object in your multimedia anyway. Maybe you just want to create a special image that will will pop-up in your Multimedia applications because of some script or other action. Like a warning or window. But you don't want to have these images active and you don't need any other states. The Solo Mode is just for that. It disables the Highlighted and Pushed frame, ao you are working with the object, just as with any other normal object However, the Solo Mode check box is recognized during the Multimedia Export and creates a separate object.
For Multimedia Builder (MMB) users
This creates a separate Bitmap object with an alpha transparency, that could be freely hidden or moved within your MMB application.
Let's continue with our example.
8. We decided that as a user moves the handle, the strange device should show some life. We wanted the middle sphere to glow like a bulb.
9. Select the Sphere and Copy it to clipboard (CTRL+C) then Paste it back (CTRL+V). This will create a new copy on the top of the first sphere. We don't want to create a bitmap button this timebut only to create a simple Bitmap object in MMB and still keep the original as a background which is why we need a copy.
The original will stay dull, and because it will have no Multimedia Extension properties set, it will be exported to the background. The new copy should be exported as a single object, so select the sphere and click Create Bitmap Object on the Multimedia Extension window. Now add a new Point light to the sphere, which will create an interesting glow. We also need to set the Inset intensity lower, to give a more raised look.
10. Now export to Multimedia Builder again. In Multimedia Builder load, the new project and you'll see that we have an additional object - Bitmap.
Hide it, because we want to show it if the user clicks on the handle. Open the handle properties by double clicking on the Button 0 in the Object list. Click the second button in Actions - Interaction with other objects- and then in the "Mouse click on the object trigger", select Show as Action1 and select Bitmap1 as Object.
That's it, now test it.
If a user clicks on the handle, the large sphere will glow and look like a light bulb.
Switch All Objects
These are helper buttons and switch all multi-frame objects to the appropriate state. For example you these when you want to switch all objects to a normal state. And if you have many Keep With Previous objects, you can actually see the whole effect by switching between the Normal/Highlighted/Pushed states.
The Multimedia function is not that hard to master, but you must be careful and always know which frame you are editing.
It can definitely be a great helper, because you can design an entire graphics interface for a multimedia program, and in the case of our Multimedia Builder, you will get a working project directly.
Export an MMB file
This is very easy. The export will create a single Multimedia Builder file (*mbd) and you can simply load it into our Multimedia Builder program.
The 3-state object will be exported as a Bitmap button. Because its surroundings depend on the position against the background, the position of the button will be locked in MMB and this is so you can't select it and drag it with a mouse by accident. The rest of the non-interactive objects will be exported as a background. If the Solo Mode was used on any object (Create Bitmap Object), it will create a movable Bitmap object with an alpha transparency.
Meta Export in MEF file
When you've worked with export to MMB long enough, you will realize one weakness. When you load your design to MMB, and then make changes, add script or do additional inter-activity, you may suddenly need to change a few things on the original design. While you can make the changes in Real-DRAW, you won't be able to update the project in MMB without loosing what you did there, or without a large amount of copy and paste, there and back, to save your scripts.
Here comes MEF to save you.
The MEF has simple requirements.
Basically if you keep the Labels of the same interactive object in Real-Draw and MMB the same, you are fine.The MEF update will also create a new object if you add a new object in Real-Draw and update the ones that remain.
What are the usual steps?
Note 1: Even if you first exported your project in Real-DRAW as an . mbd file, you can later use the MEF update option. Simply create MEF from the Real-DRAW file remembering that the first time it will change Labels in Real-DRAW. Then make the labels in MMB the same as labels of the interactive objects you now see in the Real-DRAW project. You are ready to Update from MEF.
Note 2: The first time you use the MEF Export it will cause all the Labels of interactive objects to be unique - by adding numbers. It will add a number to every interactive object; even if you just have one.
![]()
![]()